


 I'm pleased to announce that Blue Hawaii is now available for purchase. We've been tempting you with this one for a while, but now its finally tested and ready! This pattern uses our yummy new Pima Petite -- we promise its 100% cotton even though it feels so silky you'd swear it had something more exotic in it. This cute top has removable straps and the length can be adjusted to be a mid-drift bearing tube top or a more modest tunic style camisole. A bit of elastic worked around the top make it fit comfortably and securely. And since most of the body is plain stockinette you still have time to knit it up before cold weather moves in. Plus I think it would look great layered with a cardigan during cooler temperatures!
Saturday, August 30, 2008
New Pattern: Blue Hawaii Cotton Top
I'm pleased to announce that Blue Hawaii is now available for purchase. We've been tempting you with this one for a while, but now its finally tested and ready! This pattern uses our yummy new Pima Petite -- we promise its 100% cotton even though it feels so silky you'd swear it had something more exotic in it. This cute top has removable straps and the length can be adjusted to be a mid-drift bearing tube top or a more modest tunic style camisole. A bit of elastic worked around the top make it fit comfortably and securely. And since most of the body is plain stockinette you still have time to knit it up before cold weather moves in. Plus I think it would look great layered with a cardigan during cooler temperatures!
Doctors without Borders Sock Pattern
 Now you have another great excuse to buy yarn in the Doctors without Borders colorway--The Doctors without Borders Sock Pattern! Not that you should need another excuse to buy this exciting colorway, after all 50% of sales are donated to a very worthwhile organization. But now you can help us donate even more-- 50% of sales of the pattern are donated to! So what are you waiting for? Get your yarn here, your pattern here and get started!
Thursday, August 28, 2008
IMPORTANT ANNOUNCEMENT
One of our customers just sent me the following message:
"I have to admit I’m as excited about that (the Lord of the Rings Sock Club) as I am about the Wollmeise club."
That's right folks, she not only mentioned us in the same sentence as Wollmeise but even compared us favorably! I'm going to go collapse in self satisfaction now...
thanks Tan :)
"I have to admit I’m as excited about that (the Lord of the Rings Sock Club) as I am about the Wollmeise club."
That's right folks, she not only mentioned us in the same sentence as Wollmeise but even compared us favorably! I'm going to go collapse in self satisfaction now...
thanks Tan :)
Wednesday, August 27, 2008
Roving Sample Sets

Deciding between all our unique spinning fibers can be tough. Alpaca, Soy, Bamboo, Silk, Merino, Tencel...how can you choose? Well now you don't have to! Our Roving Sample Set contains six 1-ounce balls in an assortment of colors and fibers. All packaged neatly in a reusable vinyl project pouch.
Tuesday, August 26, 2008
Amani Children's Foundation

The Amani Children's Foundation is a nonprofit organization that provides care for orphaned children in Kenya. As most people are aware, there are a devastating number of orphans in Africa due to the prevalence of AIDs and the frequent violence that tears apart communities and families. The Amani Children's Foundation runs 6 New Life Homes across Kenya to provides homes and support to orphans who have nowhere else to turn. In addition to saving lives, they introduce American youth to global issues through service trips to Africa, fundraising events and educational.

Many of you are familiar with our fundraising for Doctors Without Borders with the colorway of the same name. We had so much success that we are going to try it again. The colorway to the right is based on a photo that an old friend of mine took while working with the Amani Children's Foundation in Kenya (photo at top of post). 50% of sales of this yarn will be donated to the Amani Children's Organization. 50%! That's a lot. So if you buy a $20 skein of Verve, we will donate $10. And this offer is good on ALL of our base yarns and fibers. Including kits!

But we aren't stopping there. Designer Karen Johnston came up with a beautiful mock cable sock pattern that she is donating to the cause - Entwined. The pattern costs $5 to download but ALL $5 are donated! We don't keep a single cent.
Todos Blanket
The last couple of days have been overcast and rainy. Though bad weather for drying just-dyed yarn, its been cozy weather for staying in and drinking tea and looking forward to the coming cool weather and fall season. One of my favorite things about autumn is cuddling up in a cozy blanket, sipping hot tea and eating pumpkin cupcakes. For that reason, I own lots of blankets that are the size for cuddling up on the couch or in a rocking chair out on the porch. That is, small enough to not get in the way or weigh you down, but large enough to cover y ou up and stay warm. One of my favorites is the Todos throw. This is actually one of the first patterns I designed for The Unique Sheep and uses the sample ripple stitch pattern as the Todos scarf. I named them "Todos" because, in Spanish, the word means "everything" or "all". And this blanket does contain everything. It uses 6 different yarns in different weights, fiber contents and textures. The pattern is a simple 6 row repeat that is easy to memorize and done on US#10 needles, so for a large project it knits up pretty quickly. And it is the perfect canvas for showing off handpainted yarns. What we like to do is take one of our variegated colorways, Day Break in these photos, and break it down into its different color components. Then we dye some of the yarns in semi-solids, others in variegates of 2 or more of the colors, and one or two in the original colorway. Its really fun to see our colorways broken down in that way!
ou up and stay warm. One of my favorites is the Todos throw. This is actually one of the first patterns I designed for The Unique Sheep and uses the sample ripple stitch pattern as the Todos scarf. I named them "Todos" because, in Spanish, the word means "everything" or "all". And this blanket does contain everything. It uses 6 different yarns in different weights, fiber contents and textures. The pattern is a simple 6 row repeat that is easy to memorize and done on US#10 needles, so for a large project it knits up pretty quickly. And it is the perfect canvas for showing off handpainted yarns. What we like to do is take one of our variegated colorways, Day Break in these photos, and break it down into its different color components. Then we dye some of the yarns in semi-solids, others in variegates of 2 or more of the colors, and one or two in the original colorway. Its really fun to see our colorways broken down in that way!
Saturday, August 23, 2008
Sheepy needs a new background

Summer will be over before we know it and soon the leaves will be changing color. That means its time for Sheepy, our mascot, to get a new background. As always, you can send your original photos to lbullins@bellsouth.net and, if your photo is chosen as Sheepy's background, you'll receive a free skein of yarn in a colorway inspired by your photo!
Thursday, August 21, 2008
An Oldie but a Goodie
The Allspice Vest was in the Liisu Yarns portfolio before I merged with Laura and The Unique Sheep. It was designed by Anna Zilboorg, a lady with amazing design skills and an eye for color like few others. Just check out her books to see what I mean. As you can see most are in the resale section for big $$ due to her popularity among those of us who love lots of color in our knitting.

Anyway, back to the vest. This vest is available on our site as a kit. The kit comes with about a pound and a half of Anna's Yarn in 15 randomly selected colors.
My vest is made with more than the 15 colors as I had nice little stash of Anna's Yarns left over from dye projects.
The vest is very easy to knit-- it is all garter and slip stitch with a bit of shaping at the armholes.
It is also very fun to knit as you get to experiment with how colors work around and with each other.
As with most vests-- it can be worn over short sleeve tees in the warmer months and long sleeve t's and turtlenecks in cooler months. Of course with all these colors it is sure to go with lots of things in your wardrobe.
I have also kitted the pattern with our Pima Petite yarns for some of Charlotte's customers.
Here is what one of those kits might look like:

I have not had a chance to knit the whole vest in cotton but did make a test swatch and it makes quite a nice fabric.
So if you ever want to knit a project with lots and lots of color give the Allspice Vest a try.
You will not be disappointed with the fun knitting and classic style of the finished project!
Kelly

Anyway, back to the vest. This vest is available on our site as a kit. The kit comes with about a pound and a half of Anna's Yarn in 15 randomly selected colors.
My vest is made with more than the 15 colors as I had nice little stash of Anna's Yarns left over from dye projects.
The vest is very easy to knit-- it is all garter and slip stitch with a bit of shaping at the armholes.
It is also very fun to knit as you get to experiment with how colors work around and with each other.
As with most vests-- it can be worn over short sleeve tees in the warmer months and long sleeve t's and turtlenecks in cooler months. Of course with all these colors it is sure to go with lots of things in your wardrobe.
I have also kitted the pattern with our Pima Petite yarns for some of Charlotte's customers.
Here is what one of those kits might look like:

I have not had a chance to knit the whole vest in cotton but did make a test swatch and it makes quite a nice fabric.
So if you ever want to knit a project with lots and lots of color give the Allspice Vest a try.

You will not be disappointed with the fun knitting and classic style of the finished project!
Kelly
Tuesday, August 19, 2008
Soap
To go with our new Wash Cloth/ Soap Sack Kits we need lots of handmade soap so this week thats what I'm focusing on. Even though I've been making soap off and on for a year or so I still consider myself a novice and each batch is an exciting experiment. I never really know how its going to turn out. In some ways, soap making is very simple: you take fats/oils and add lye and it turns into soap. Thats pretty much it. But its also surprisingly complex. There are tons of different fats and oils that you can use and I'm only beginning to learn the benefits of them and how they can affect both the process of making the soap and the finished result. Thankfully there is a really good lye calculator at Majestic Mountain Sage (one of my favorite sources for soap supplies) so once I've decided what oils to use and in what ratios I can plug in the numbers and it tells me how much lye to use. That simplifies things a lot and so far seems to work pretty well. I've had some people express interest in the soap making process so I tried to take lots of pictures today to share with you.
 Step 1: gather all supplies. once things get started you shouldn't leave, so its important to have everything you need within reach. Soap making is rather messy and the smell can be really strong. Its not a bad smell, but the essential oils can quickly become unbearably strong, especially in a small apartment. So I do my soapmaking out on our little porch.
Step 2: Measure out all your oils and fats by weight and start melting them. I used the same recipe for all three batches I made today, but with different fragrances/colors/additives. The recipe calls for Soybean Oil, Coconut Oil and Olive oil-- all very common, basic soap ingredients. I have an electrical burner and an old pot that works really well. While that starts heating, I weigh out the water and add the lye and set that aside. The lye mixture is really caustic and toxic and gets really, really hot and smelly. So I put it as far away from me as possible and avoid breathing in the fumes at all costs. When I used to make soap inside I would let the lye mixture sit outside so that the fumes didn't get trapped inside with me. Gloves and masks are helpful for this step.
Step 3: While the oil is heating and the lye mix is cooling I get the molds ready. I use wooden boxes that my mom made for me and line them with freezer paper to make removing the soap easy. Each mold is 14" long and holds about 50 ounces of soap which is about 12-15 bars of soap. Sometimes I make soap in 1-box batches, but can do up to 3-boxes at a time.
Step 4: Once both the oils and the lye mix are between 100-150 degrees (I use a candy thermometer to check) its time to mix them. I pour the oil into a bucket and slowly add the lye mixture. The next part is the fun part; using my brand new stick blender I mix the heck out of it and watch the colors swirl and change and things start to change. I wanted to get a photo of this, but I couldn't operate the stick blender and the camera at the same time. When it all goes into the bucket its clear liquid but quickly it becomes creamy and starts to thicken. You know its "done" (the technical term is "trace") when it will support drops on the surface. People say its supposed to be the texture of custard but whenever I've tried to make custard I've burnt it, so that comparison doesn't work for me.
Step 5: Once the soap has reached trace its time to add fragrances, colorants and any other additives. I've heard you can add them earlier, but I've also heard that they can prevent the soap from tracing, so I usually add them at t he end. In this photo you can see where I've divided the batch up into thirds after reaching trace and added colorant & fragrance to each part. The dark brown at the top has cinnamon essential oil and ground cinnamon, the red is raspberry scented and the yellow is on its way to becoming orange scented and colored. For the other batches I made today I added Lavender EO and lavender buds to one and to the other I added Tahitian Vanilla fragrance, Pineapple Cilantro fragrance and some ground pumice for a light exfoliating texture. For the last batch I used yellow coloring for about 2/3 of it and orange for the rest. I'm hoping it will turn out as a nice swirl.
 Step 6: pour the thickening soap into the molds. Its important that the soap be poured at the right time. If you are too impatient and pour it into the molds before trace has been reached, it won't set up right. But if you wait too long it becomes really thick and hard to pour. When that happens you just have to push it down into the mold and hope its not too ugly when it comes out!
Step 7: Now the magic happens. Once the soap has been poured into the molds all sorts of crazy things can happen. The chemical reaction that started when the lye was adde d to the oils continues in the molds. First, it gets really warm. Then the color and texture might start to change. Sometimes a crack forms on top, like a loaf of bread. I'm not sure why (another sign of my novice status), but usually it flattens back out and doesn't cause any problems. Thats what happened with the lavender batch this time. The other two blocks didn't crack, but they did have intense color changes. Above you can see the yellow tropical batch immediately after pouring. See how creamy and light it is? When I checked on it later it had become darker, translucent and covered in little oily pimples!
 The Cinnamon Spice block had a similar reaction. You can see in this photo the light orange around the edges-- originally the whole surface was that color but it gradually changed to dark, translucent red with more of those little oily pimples. I've never had the pimples occur before.

Although weird things can happen at this stage, there isn't anything you can do about it and for the most part the changes aren't bad or permanent. I just like to keep checking to see what sort of bizarre things are happening.
 Step 8: Once the soap has become solid it can be removed from the molds. I often hear people say it takes a day or two but in my experience I'm often able to remove the bricks from the molds after a few hours, certainly after letting them rest over night. It takes longer if you are using fancy molds, though. Once removed from the molds they are still pretty soft and need to sit for a day or two before being sliced. I can't resist cutting off a little slice from the end,
 though, to see how its going to look!
Step 9: Once the soap is firm enough to slice its cut into bars and then set somewhere with good air circulation to cure for...a while. I'm not really sure how long it needs to cure, to be honest. Hmm, thats something I need to look into.
Now you know as much as I do about how to make soap!
 Step 1: gather all supplies. once things get started you shouldn't leave, so its important to have everything you need within reach. Soap making is rather messy and the smell can be really strong. Its not a bad smell, but the essential oils can quickly become unbearably strong, especially in a small apartment. So I do my soapmaking out on our little porch.
Step 2: Measure out all your oils and fats by weight and start melting them. I used the same recipe for all three batches I made today, but with different fragrances/colors/additives. The recipe calls for Soybean Oil, Coconut Oil and Olive oil-- all very common, basic soap ingredients. I have an electrical burner and an old pot that works really well. While that starts heating, I weigh out the water and add the lye and set that aside. The lye mixture is really caustic and toxic and gets really, really hot and smelly. So I put it as far away from me as possible and avoid breathing in the fumes at all costs. When I used to make soap inside I would let the lye mixture sit outside so that the fumes didn't get trapped inside with me. Gloves and masks are helpful for this step.
Step 3: While the oil is heating and the lye mix is cooling I get the molds ready. I use wooden boxes that my mom made for me and line them with freezer paper to make removing the soap easy. Each mold is 14" long and holds about 50 ounces of soap which is about 12-15 bars of soap. Sometimes I make soap in 1-box batches, but can do up to 3-boxes at a time.
Step 4: Once both the oils and the lye mix are between 100-150 degrees (I use a candy thermometer to check) its time to mix them. I pour the oil into a bucket and slowly add the lye mixture. The next part is the fun part; using my brand new stick blender I mix the heck out of it and watch the colors swirl and change and things start to change. I wanted to get a photo of this, but I couldn't operate the stick blender and the camera at the same time. When it all goes into the bucket its clear liquid but quickly it becomes creamy and starts to thicken. You know its "done" (the technical term is "trace") when it will support drops on the surface. People say its supposed to be the texture of custard but whenever I've tried to make custard I've burnt it, so that comparison doesn't work for me.

Step 5: Once the soap has reached trace its time to add fragrances, colorants and any other additives. I've heard you can add them earlier, but I've also heard that they can prevent the soap from tracing, so I usually add them at t
he end. In this photo you can see where I've divided the batch up into thirds after reaching trace and added colorant & fragrance to each part. The dark brown at the top has cinnamon essential oil and ground cinnamon, the red is raspberry scented and the yellow is on its way to becoming orange scented and colored. For the other batches I made today I added Lavender EO and lavender buds to one and to the other I added Tahitian Vanilla fragrance, Pineapple Cilantro fragrance and some ground pumice for a light exfoliating texture. For the last batch I used yellow coloring for about 2/3 of it and orange for the rest. I'm hoping it will turn out as a nice swirl. Step 6: pour the thickening soap into the molds. Its important that the soap be poured at the right time. If you are too impatient and pour it into the molds before trace has been reached, it won't set up right. But if you wait too long it becomes really thick and hard to pour. When that happens you just have to push it down into the mold and hope its not too ugly when it comes out!
Step 7: Now the magic happens. Once the soap has been poured into the molds all sorts of crazy things can happen. The chemical reaction that started when the lye was adde
 d to the oils continues in the molds. First, it gets really warm. Then the color and texture might start to change. Sometimes a crack forms on top, like a loaf of bread. I'm not sure why (another sign of my novice status), but usually it flattens back out and doesn't cause any problems. Thats what happened with the lavender batch this time. The other two blocks didn't crack, but they did have intense color changes. Above you can see the yellow tropical batch immediately after pouring. See how creamy and light it is? When I checked on it later it had become darker, translucent and covered in little oily pimples!
 The Cinnamon Spice block had a similar reaction. You can see in this photo the light orange around the edges-- originally the whole surface was that color but it gradually changed to dark, translucent red with more of those little oily pimples. I've never had the pimples occur before.
Although weird things can happen at this stage, there isn't anything you can do about it and for the most part the changes aren't bad or permanent. I just like to keep checking to see what sort of bizarre things are happening.
 Step 8: Once the soap has become solid it can be removed from the molds. I often hear people say it takes a day or two but in my experience I'm often able to remove the bricks from the molds after a few hours, certainly after letting them rest over night. It takes longer if you are using fancy molds, though. Once removed from the molds they are still pretty soft and need to sit for a day or two before being sliced. I can't resist cutting off a little slice from the end,
 though, to see how its going to look!
Step 9: Once the soap is firm enough to slice its cut into bars and then set somewhere with good air circulation to cure for...a while. I'm not really sure how long it needs to cure, to be honest. Hmm, thats something I need to look into.
Now you know as much as I do about how to make soap!
Bath Set Kits

This summer we introduced our first cotton yarn- Pima Petite. A great way to try it out is to make a washcloth. But not just any washcloth. One of our favorite designers, LoBug, has come up with patterns for lovely bath cloths and soap sacks that we have kitted up with our handpainted cotton yarn. You can get the complete set with yarn for both a cloth and a soap sack, or buy the smaller size with enough yarn for one or the other. And with each kit you get a yummy bar of soap made from scratch by me!
Thursday, August 14, 2008
The Color Co-op - A Multi Dyer Club

Thats right, another opportunity to have yummy Unique Sheep yarn delivered right to your door every other month. This one is a little different though. The Color Co-op is a multidyer club. There are 6 dyers: The Unique Sheep, Sanguine Gryphon, Macek Designs, Mama Llama, Miss Babs and Tactile Fiber Arts. Each month club members will vote on a photograph or other piece of visual art submitted by members to be the ‘inspiration’ for that months colors. Each month you will receive a skein of yarn from one of the dyers, so after 6 shipments you will have rotated through all of us. You can find out more (and sign up!) here. This is a pay-as-you-go club, so to sign up you just pay for the first month.
The first shipment goes out in November, so you only have until October to sign up!!
Crochet Baby Cardigan Update
The crochet baby cardigan is now available to purchase on the website! Enjoy!
Super Wool
Lately I have been knitting up a storm, partially justified by the Knitting Olympics. Though not on purpose, I'm working on several projects using Super Wool right now. And I actually have some FO pictures to share!
First up-- Estonian Embrace Socks. Ok, well I'm not completely finished yet. But you only need one sock to take pictures. I'm about 1/2 up the foot of the second sock. This pattern was written for The Unique Sheep and Super Wool and is really neat. The pattern calls for some new (to me) techniques for the toe, heel and bind off but if you aren't looking for a challenge I think it would work just fine using your favorite toe/heel/bind off. The really special part of the design is the cuff. A contrast colored yarn is worked into the cuff using a unique slip stitch technique that is easy to learn and quick to memorize. And because Super Wool is used on size 2 needles, its a faster knit than your standard fingering weight sock. Thats my type of sock!
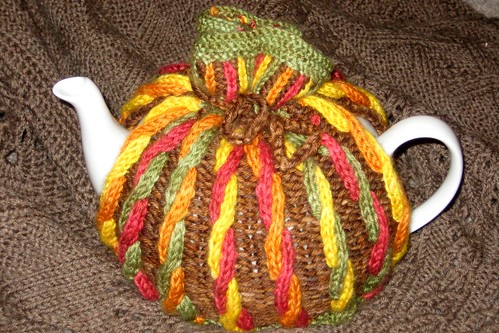 Next up-- a tea cozy! Lately I've really gotten into drinking tea but if I make a pot it gets cold before I'm done. So I picked up a copy of the book Tea Cozies, dyed up some Super Wool in a bunch of semi-solid autumnal colors, and this is what I ended up with! What do you think? I just finished it so I haven't tried it yet, but I think a pot of tea might be just what I need this afternoon while I tackle the pile of laundry that is threatening to take over the bedroom.
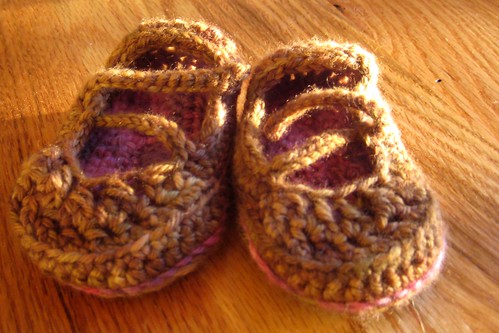
And finally, an adorable pair of crocheted baby shoes designed by Sylver. She has several great patterns for baby shoes, as well as a couple for adult sized slippers. You can buy her patterns on her etsy shop, but she also sells them wholesale so I was thinking, if there is interest, we could sell them as kits through The Unique Sheep. That way for a little pair of booties you won't have to buy 2 full skeins of wool. What do you think? Would it be a waste of my time or something that you would be interested in?
I think thats all I have finished for now, but I've got a couple more blog posts brewing so stay tuned!
First up-- Estonian Embrace Socks. Ok, well I'm
not completely finished yet. But you only need one sock to take pictures. I'm about 1/2 up the foot of the second sock. This pattern was written for The Unique Sheep and Super Wool and is really neat. The pattern calls for some new (to me) techniques for the toe, heel and bind off but if you aren't looking for a challenge I think it would work just fine using your favorite toe/heel/bind off. The really special part of the design is the cuff. A contrast colored yarn is worked into the cuff using a unique slip stitch technique that is easy to learn and quick to memorize. And because Super Wool is used on size 2 needles, its a faster knit than your standard fingering weight sock. Thats my type of sock!Next up-- a tea cozy! Lately I've really gotten into drinking tea but if I make a pot it gets cold before I'm done. So I picked up a copy of the book Tea Cozies, dyed up some Super Wool in a bunch of semi-solid autumnal colors, and this is what I ended up with! What do you think? I just finished it so I haven't tried it yet, but I think a pot of tea might be just what I need this afternoon while I tackle the pile of laundry that is threatening to take over the bedroom.And finally, an adorable pair of crocheted baby shoes designed by Sylver. She has several great patterns for baby shoes, as well as a couple for adult sized slippers. You can buy her patterns on her etsy shop, but she also sells them wholesale so I was thinking, if there is interest, we could sell them as kits through The Unique Sheep. That way for a little pair of booties you won't have to buy 2 full skeins of wool. What do you think? Would it be a waste of my time or something that you would be interested in?
I think thats all I have finished for now, but I've got a couple more blog posts brewing so stay tuned!
Sunday, August 10, 2008
FO's

It has been awhile since I posted a finished FO, but most of my time has been spent working on Deadly Spins projects like the Sloth hat and alternate pattern:
I also finished a crochet baby cardigan designed by the same designer of our Sloth hat. The crochet cardigan is based on the knitted EZ Baby Surprise Jacket.

I dyed 4-50 gram skeins of Super Wool using the Gradiance dyeing technique.
I do not have a name for the colorway (HELP HERE!!) or pics of the skeins as I used almost all the yarn for the sweater.

I used size H hook—up a size from the suggested.
The finished sweater weighs about 176 grams and is between size 18 mths and 2 yrs, so 4 50-gram skeins of Gradiance in Super Wool is plenty.
Kelly
Monday, August 4, 2008
New Sock Club!

I'm so every excited to announce a new sock club sponsored by The Unique Sheep in collaboration with LoBug Designs. The Lord of the Rings sock club is, well, just what its name implies. A sock club for fans of the Lord of the Rings-- the book or the movie (or the audio book, which I'm enjoying right now). The club includes six shipments of exclusive Lord of the Rin
 g inspired patterns by LoBug matched with Unique Sheep yarns in exclusive colorways developed in collaboration with the designer. The club will begin in February '09 which seems far away now, but will be here before you know it. Membership will be limited to ensure quality customer service, so don't delay in signing up.
ETA: please let me know if you have any problems signing up, my paypal buttons have been acting up a bit tonight!
Looking for Photos
Can you believe its already August? Though I'm not a student anymore, August still symbolizes in my mind the beginning of the school year and the return of fall. We still have weeks of heat to endure, but the promise of cooler weather is on the horizon. And that means that its time to dye new autumnal colors! Almost ever season I ask you- our customers and readers- to submit photos that you have taken to inspire new colorways. You can read more about the rules of the contest here and see examples of past winners here. Submissions should be sent to lbullins@bellsouth.net
Serendipity Skeins
Sometimes skeins don't turn out the way we planned. The color might be a bit off from the colorway we were aiming for, or maybe we mis-measured and the skein is too small. Unfortunately sometimes there are knots. And when we are developing new colors it often takes a couple of trial runs. These skeins are irregular, but they are often beautiful and unique. So what do we do with all these "happy accidents", you ask? We call them Serendipity Skeins and post them in our new Etsy shop for you to buy at a discounted price! Unlike our website, the etsy shop contains one-of-a-kind skeins. So if you see something you like, don't hesitate. Once its gone, its gone. We will add skeins as they become available, so check back often. All the base yarns and dyes are the same high quality that we sell on the website.
Subscribe to:
Posts (Atom)